We’ve all done this before:
- Create a VM
- Mount a bunch of VHDX all the same size
- Go into the OS and struggle to figure out which VHDX is which
I just did this to myself when creating a Commvault Media Agent VM on RHEL 8. I needed 3x VHDX, all 2TB in size, mounted for dedup and indexing. I purposely placed those VHDX files on different underlying S2D virtual disks for performance/space reasons. It was important to make sure that I configured stuff inside the VM correctly.
Thankfully, it’s super easy to parse this out.
The first step is to identify how the VHDX files are attached to your VM. If you’re using Generation 2 VMs, they’re probably attached to a virtual SCSI controller:
Get-VMHardDiskDrive -VMName VMNAME -ComputerName HYPERVHOST | FT Path, ControllerNumber, ControllerLocation

Now we hop into the Linux VM itself and see how the devices are presented there. You’re going to run lsblk -S to get the info we need:
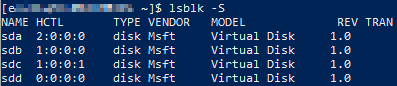
Fantastic! Now we know which device is mounted to which SCSI controller (that’s the stuff listed under the HCTL column). The last step is to cross-reference the output from PowerShell to the output of lsblk :
- sda = index-disk-00.vhdx
- sdb = dedup-disk-00.vhdx
- sdc = dedup-disk-01.vhdx
- sdd = os-disk-00.vhdx
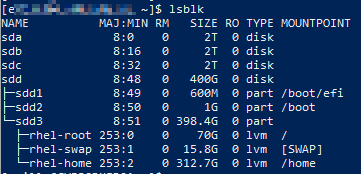
If you’re looking to identify things by size, there are other commands you can run in your Linux VM to get more details about those devices. I just always resort to lsblk out of habit:

Bonus – How to partition and format!
If you’re curious how to now configure your VHDX to use, follow these steps:
# Identify what device you want
lsblk

# Launch fdisk utility and configure device (assume sdb)
fdisk /dev/sdb

# delete anything
> d

# new partition
> n

# select partition 1
> 1

# specify first/last sectors by hitting enter twice with default
> enter
> enter

# commit changes
> w

# Create the filesystem
mkfs.ext4 /dev/sdb1

# Mount the partition
mount /dev/sdb1 /var/opt/whatever