Introduction
In October 2021, I was fortunate enough to get my hands on an early release of the Azure Virtual Desktop Private Preview for Azure Stack HCI (AVD on ASHCI from hereon out). You can read about the announcement at Microsoft Ignite here.
Like many of the hybrid offerings Microsoft has been pumping out since ASHCI went GA, you my be wondering why someone would want to run these traditional cloud workloads on-prem. And specifically in the case of AVD, you may balk at the idea of giving up your traditional VDI infrastructure and paying Microsoft a premium to use your own hardware.
This article is not going to focus on trying to convince you to abandon their traditional VDI setup. What I do plan on doing is documenting why AVD is great because:
- The ease of setup
- The minimal time spent managing the environment
- The dozens of hybrid benefits that come along with ASHCI
With working-from-home becoming the “new normal” during the COVID pandemic, many companies had to take appropriate action to get their employees online in a secure and scalable manner. For years, on-prem VDI has been one such solution. Regardless of the deployment method (Hyper-V VDI, VMware, Citrix), the cost of infrastructure, licensing, and trained employees to manage it all is outside the reach for many.
Azure Virtual Desktop (formally known as Windows Virtual Desktop) solved one portion of that – easily deploy Windows 10 or Server VMs in Azure and give employees access via Azure AD + MFA. You could even limit ingress/egress traffic using ExpressRoute or VPN Private Endpoints.
But what about the scenario where you have 1000s of employees, data sovereignty concerns, or GPU requirements? You could host it all in Public Azure, but the price to keep VMs running adds up quickly. That is where AVD on ASHCI fits in – a hybrid, customer-owned solution to bridge the gap for what customers truly need!
Prerequisites
In this blog, we’re going to focus on the Windows 10 Multisession deployment. Yes, you can deploy Windows Server, but we want to demonstrate Windows 10 Multisession running on on-prem hardware, as that appears to be one of the biggest benefit for users.
The only requirements for Day 1 are:
- A registered Azure Stack HCI cluster (running 20H2 or newer)
- On-prem Active Directory sync’d to an Azure AD Tenant
- A user who is an Azure AD Cloud Administrator or Global Administrator (required if your ASHCI cluster has not been registered to Azure yet)
- An Azure Subscription with a user as an Owner or Contributor
- An SMB file share for FSLogix user profiles (this can be on-prem or Azure Files)
- The super special Windows 10 Multisession image, downloaded specifically from an Azure Managed Disk (more on this later)
Configuration
Step 1
Configure your ASHCI cluster and register it with Azure. This is where your workload VMs will run. Yes, it needs to be ASHCI and not a traditional Windows Server SKU. This is due to licensing and technical limitations with the Windows 10 Multisession images you’ll be using that check what OS the parent hypervisor is running.
Your ASHCI cluster can be 20H2, 21H2, or even the 22H2 Private Preview (however, I would stick to a GA releases to eliminate any regressions). As for the actual configuration and registration of your cluster, I am not going to go in-depth as you can find plenty of guides and official documentation on how to do this.
Step 2
Create a few Virtual Disks CSVs for your AVD Virtual Machines. The volumes should probably be 100-200GB in size, depending on how many VMs you plan on having. Remember, the goal here is to leverage Windows 10 Multisession and FSLogix, so you probably won’t have too many VMs. Your base OS image will ultimately decide final sizing. If you’re tight on space, you can always enable ReFS Deduplication (VDI is typically a fantastic use-case for Dedup).
As you get more comfortable with the configuration and deployment nuances, you can play around with CSV Block Cache, different tiering (MAP vs Mirror), and different media types (NVMe vs SSD vs HDD).
Step 3
For rapid deployment of AVD VMs, we’re going to leverage a sysprep’d “template VM” to clone. I suggest creating a “working” Virtual Disk CSV for this and other data. It should be at least 200GB in size and can be on “slower” storage if need be.
Step 4
It’s time to create the AVD VM Template that we will clone everything from.
I found it easiest to to accomplish all of this through Azure Cloud Shell, which comes baked into Windows Terminal. You could also install the Azure cmdlets directly on your ASHCI cluster nodes if you wish, but I advise against that.
# Specify the Subscription ID and the Resource Group name you want your stuff deployed to
$subscriptionID    = "YYYYYYYY"
$resourceGroupName = "ZZZZZ"

# Set the context to the Subscription specified above
az account set --subscription $subscriptionID

# Register required providers on your Subscription for AVD on HCI
az provider register --namespace 'Microsoft.HybridCompute'
az provider register --namespace 'Microsoft.GuestConfiguration'

# Get a list of all available Windows 10 or 11 images in the Marketplace
# Here are some examples of images you may be interested in

# Windows 10 Multisession (all builds)
az vm image list --all --publisher "microsoftwindowsdesktop" --offer "windows-10" | ConvertFrom-Json | ? sku -like "*avd*" | FT

# Windows 11 Multisession (all builds)
az vm image list --all --publisher "microsoftwindowsdesktop" --offer "windows-11" | ConvertFrom-Json | ? sku -like "*avd*" | FT

# Windows 11 Multisession + Office 365 (all builds)
az vm image list --all --publisher "microsoftwindowsdesktop" --offer "office-365" | ConvertFrom-Json | FT

# Set the $urn variable to whatever image URN you picked
# In this example, I am picking 19044.1889
$urn = "MicrosoftWindowsDesktop:Windows-10:win10-21h2-avd-g2:19044.1889.220805"

# Pick a descriptive name for the disk image and create a Managed Disk in the Subscription
# In this example, the build number was 19044.1889, so I named my disk that
$diskName = "WIN10-21H2-Multisesh-19044.1889"
az disk create -g $resourceGroupName -n $diskName --image-reference $urn

# Generate a downloadable link for the Managed Disk and output it to the console
$sas = az disk grant-access --duration-in-seconds 36000 --access-level Read --name $diskName --resource-group $resourceGroupName
($sas | ConvertFrom-Json)[0].accessSas
Step 5
Download the VHD via the URL generated in the last line of the above script. This file will be 127GB and may take awhile to download via browser. If you have azcopy installed somewhere, I recommend using that to significantly speed it up:
# Reminder: this step is unneccessary and you can just download via browser
# I specified a bandwidth cap of 500mbps because the Storage Account may throw 503 errors if it's slammed too hard
# I also specified ignoring the md5 hash because it appears the blob's hash changes midflight due to... something? You can confirm this by watching the azcopy logs
azcopy copy "https://<MANAGED-DISK-SAS-URL-GENERATED-ABOVE>" "C:\ClusterStorage\WORKING-VOL\w10multi-full.vhd" --cap-mbps 500 --check-md5 NoCheck
Step 6
After the download completes successfully, revoke access to the Managed Disk:
# You can delete the disk after this step as well, but I opted to keep it around
az disk revoke-access --name $diskName --resource-group $resourceGroupName
Step 7
Convert the VHD to a Dynamic VHDX. While this is technically unnecessary, having a 127GB sparse file is obnoxious, especially when the actual OS image is only consuming about 10GB:
# This may take a bit, so go grab a cup of coffee or walk the dog
# When done, you can delete the original 127GB VHD if you wish
# Obviously feel free to pick whatever naming convention works for you
Convert-VHD -Path "C:\ClusterStorage\WORKING-VOL\w10multi-full.vhd" -DestinationPath "C:\ClusterStorage\WORKING-VOL\w10multi-dyn.vhdx" -VHDType Dynamic
Optimize-VHD -Path "C:\ClusterStorage\WORKING-VOL\w10multi-dyn.vhdx" -Mode Full
Step 8
Create your “template” VM with the specs you want (CPU, RAM, add the VHDX you just made, vNIC on a Virtual Switch with appropriate VLAN tag, etc). You can do this via WAC, Hyper-V manager, FCM, or raw PowerShell. I stored this VM on my “Working” CSV.
Once this “template” is created, you can either leave it as-is or turn it on to install the software your employees may need. If you do decide to turn it on and configure it, make sure to run sysprep and shut it down when completed.
Step 9
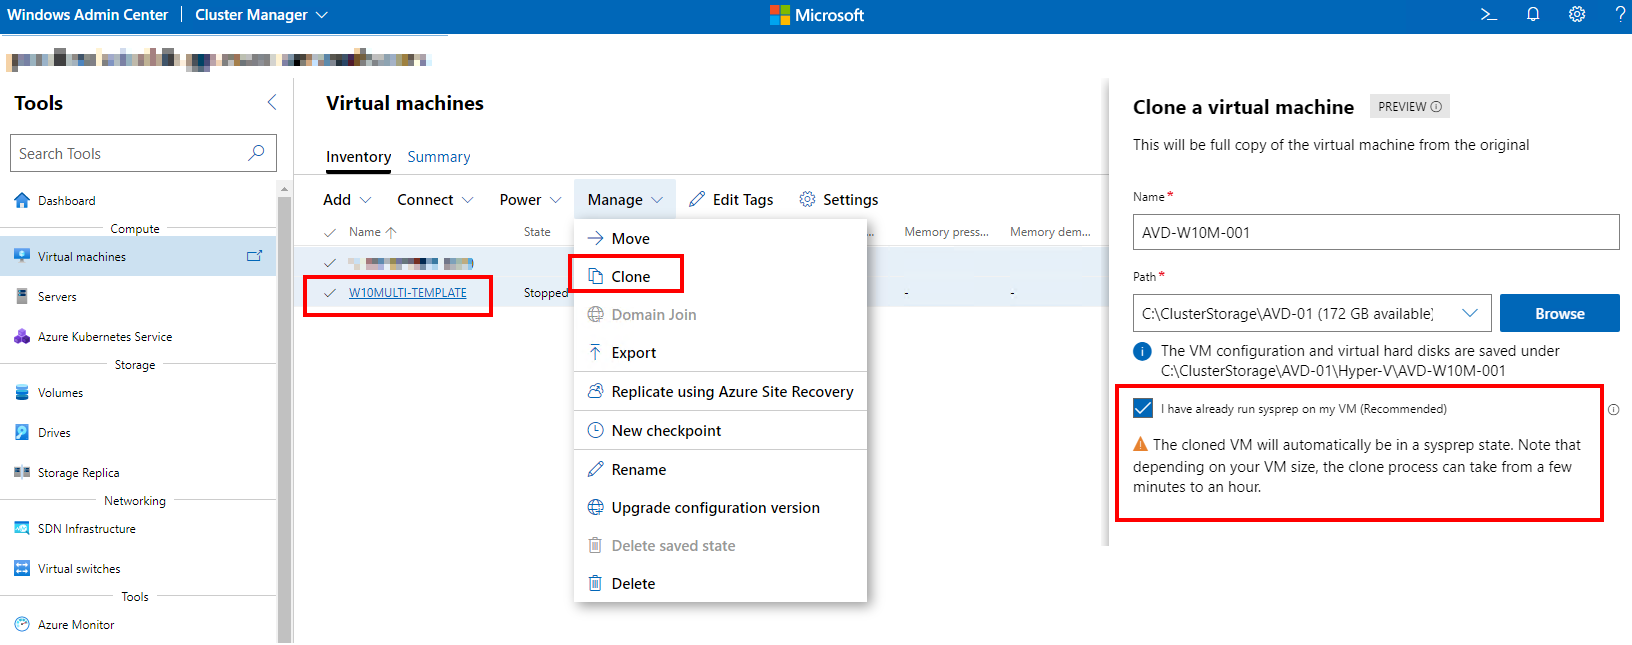
Clone the “template” VM as many times as you want based on your scale requirements (number of users, active sessions, guaranteed specs, etc). I opted to use WAC to clone my “template”, but you can Export/Import via Hyper-V or even use SCVMM if you’re running a supported version.
WAC’s Cloning function will ask you for the CSV to store the VM on as will also ask if your image is sysprep’d already.
Keep in mind that you will be defining the max number of active RDP sessions per VM later on in the AVD setup.
Step 10
Start the AVD VMs and join them to your local on-prem Active Directory. Install whatever software you require your users to have. Configure your Local Administrators and Remote Desktop User groups as required for access. You shouldn’t need to enable RDP as the image should have it turned on by default, but quickly confirm that it isn’t disabled by some rouge GPO setting.
Step 11
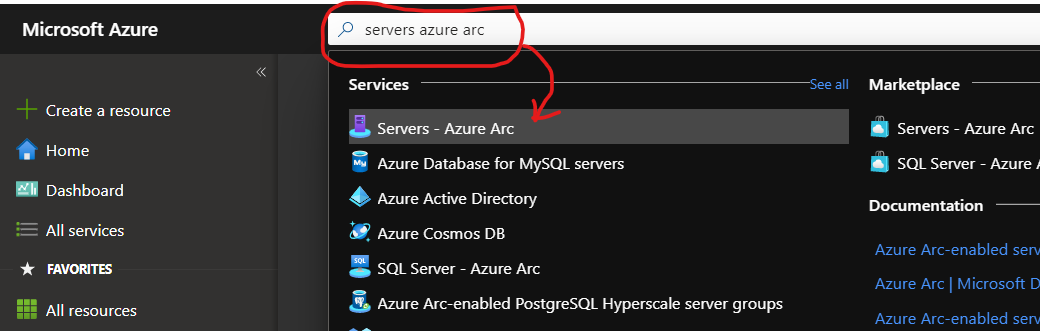
Register your AVD VMs as Azure Arc Servers. This will require using the Azure Portal itself and searching for “Servers – Azure Arc” in the search bar up top.
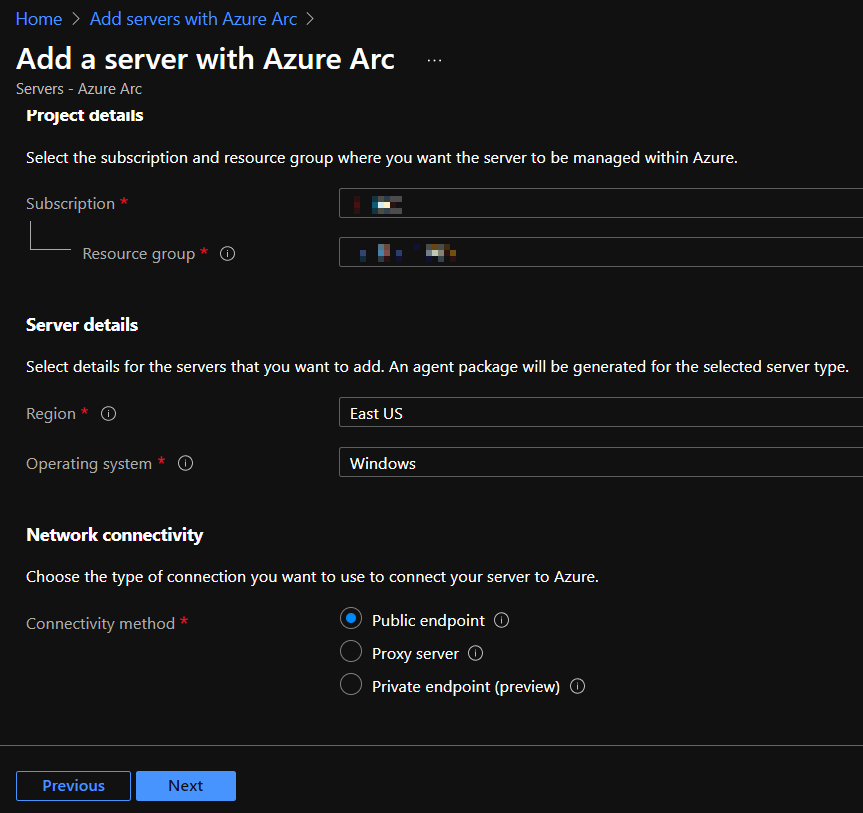
Once in that section, click on Add > Add a single server > Generate Script . Click through all the steps, making sure to specify the Subscription, Resource Group, and the Network Connectivity you require (Public Endpoint is probably what you will require, but YMMV).
RDP or Console into your AVD VM. Copy and paste the PowerShell script into the AVD VM and run it. Before the script finishes, you will be prompted for authentication via the Device Login workflow. Make sure you are logged in as an Azure user who is a Owner or Contributor on the Subscription and browse to the URL to enter the code in the PowerShell output.

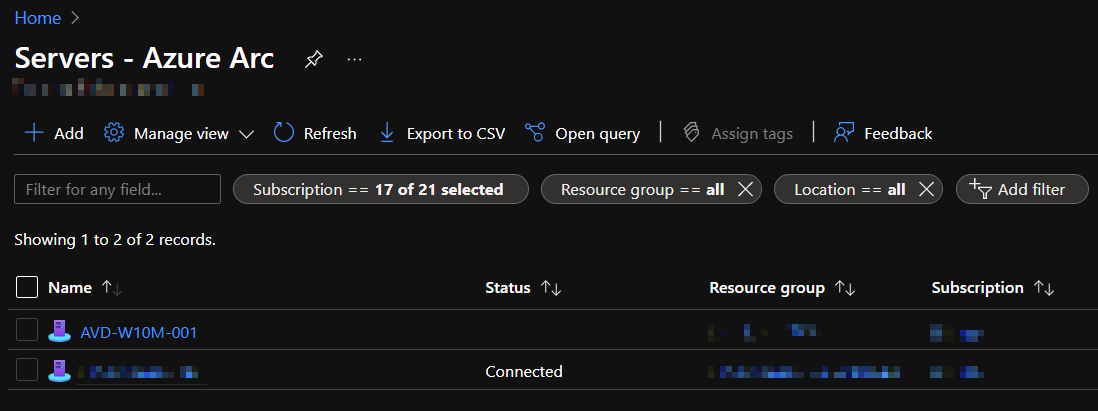
Once complete, you’ll now see your server registered as an Azure Arc Server
Step 12
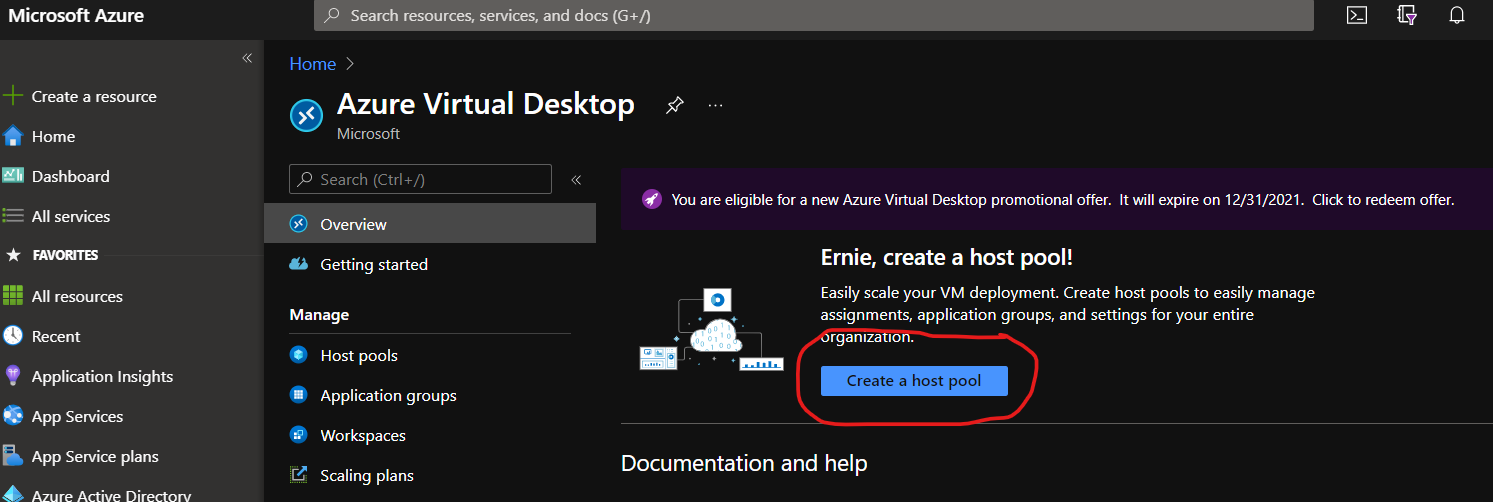
From the Azure Portal, we need to create an AVD Host Pool. You can search for “AVD Host Pool” or you can click this link to go directly there. Click on the Create a Host Pool button to begin this process.
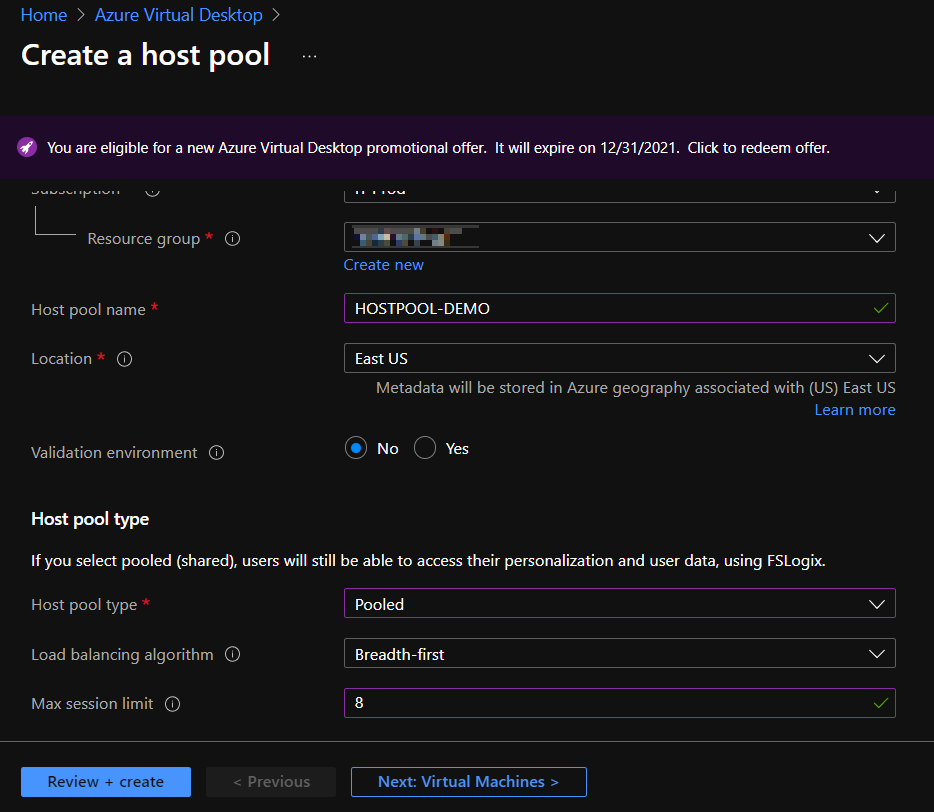
Select the Subscription, Resource Group, and Name for the Host Pool. Your Location can be changed to something “local” to you. It’s just used for metadata. The Validation Environment settings are dependent on your specific needs, but odds are you can keep this default.
The important settings are in the Host Pool Type area. If you’re using Windows 10 or Windows 11 image, you most likely want to be using a Pooled pool type (ex – to keep the number of VMs low and leverage GPUs with Hyper-V). The Load Balancing Algorithm is entirely personal preference. Select Breadth-First if you want users to “equally” spread across all available VMs. Select Depth-First if you want users to “fill up” a VM one-at-a-time. Lastly, the Max Session Limit is an integer that sets how many users can be logged into a VM at a time. Set this based on your resource requirements per-user.
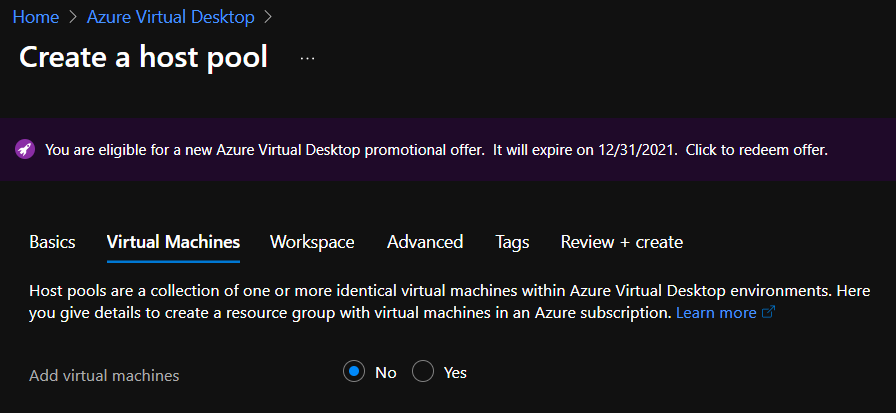
Do not select anything under Virtual Machines – we are obviously not creating any VMs in the Public Cloud 🙂
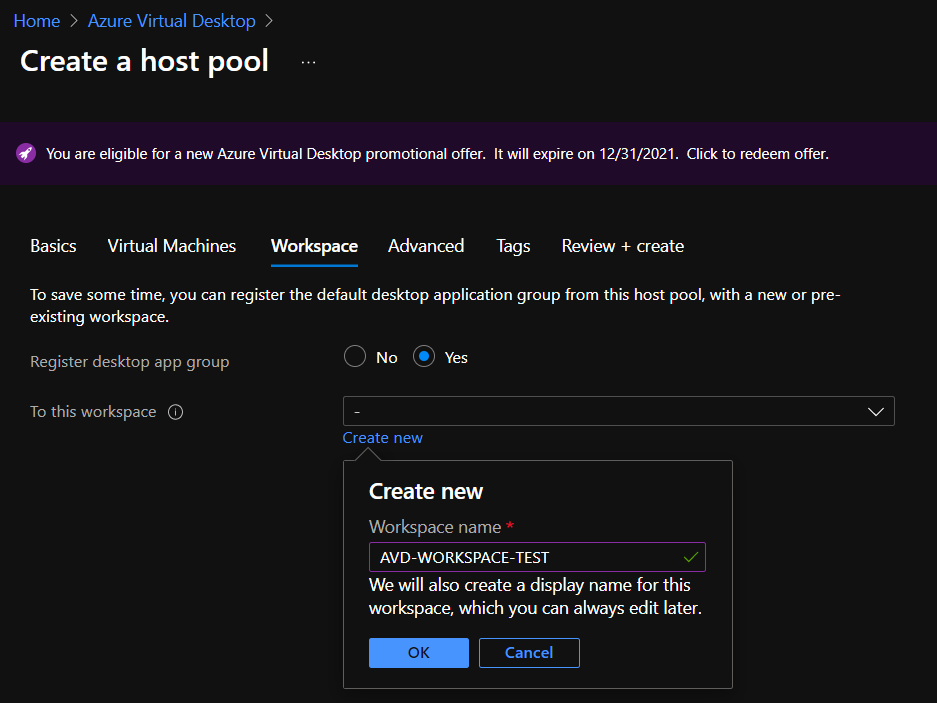
Save some time and create a Workspace now. The name can be changed later.
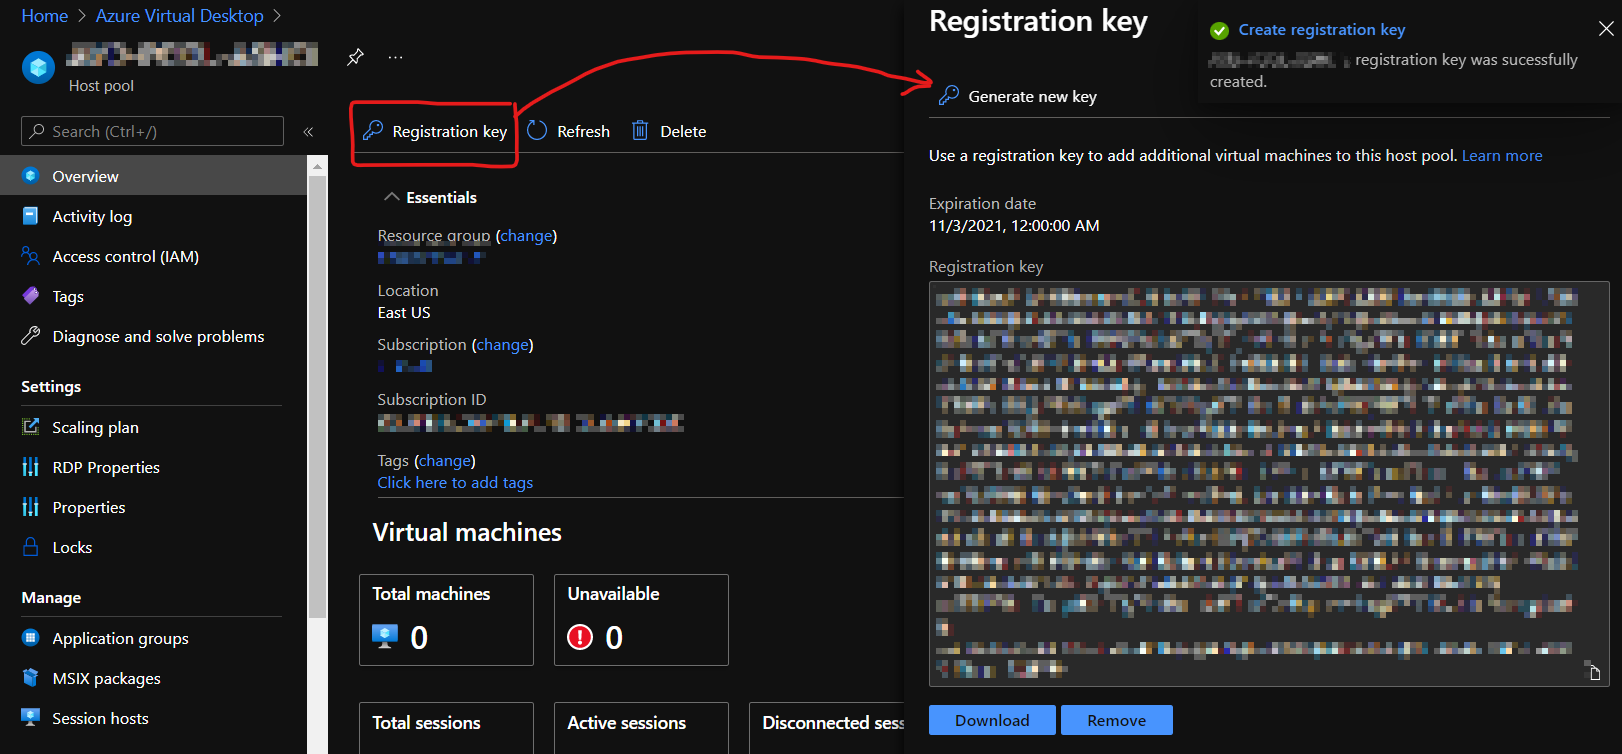
Finish clicking through the last few steps and make your Host Pool. Once created, enter into it and generate a Registration Key. You will need to save or copy this key for the following step.
Step 13
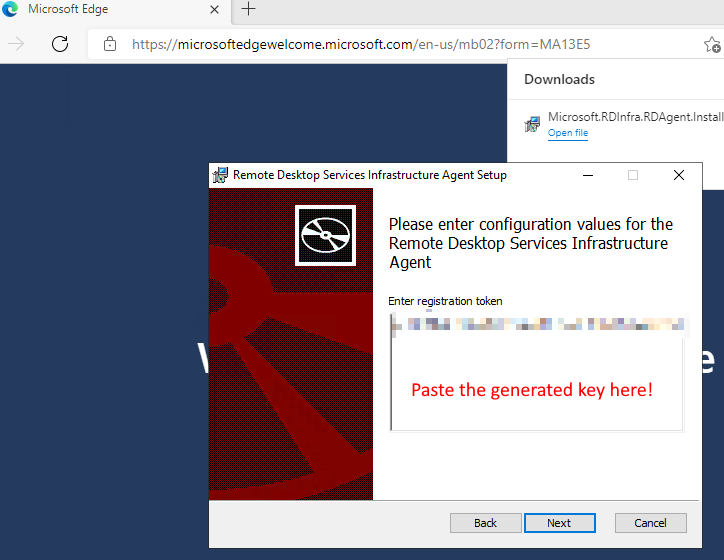
We need to install 2x more Agents on the AVD VM – the AVD Agent and the AVD Agent Bootloader.
You can find the latest version of these agents from this link, but to save you some time, here are direct downloads (as of Nov 2, 2021)
- AVD Agent – https://query.prod.cms.rt.microsoft.com/cms/api/am/binary/RWrmXv
- AVD Agent Bootloader – https://query.prod.cms.rt.microsoft.com/cms/api/am/binary/RWrxrH
Download the Agent and run it on the AVD VM. You’ll be prompted for the Registration Code saved in the previous step. Enter it and finish the install.
Once done installing the first agent, download the Bootloader and run it. There is nothing to configure; just click through the entire wizard.
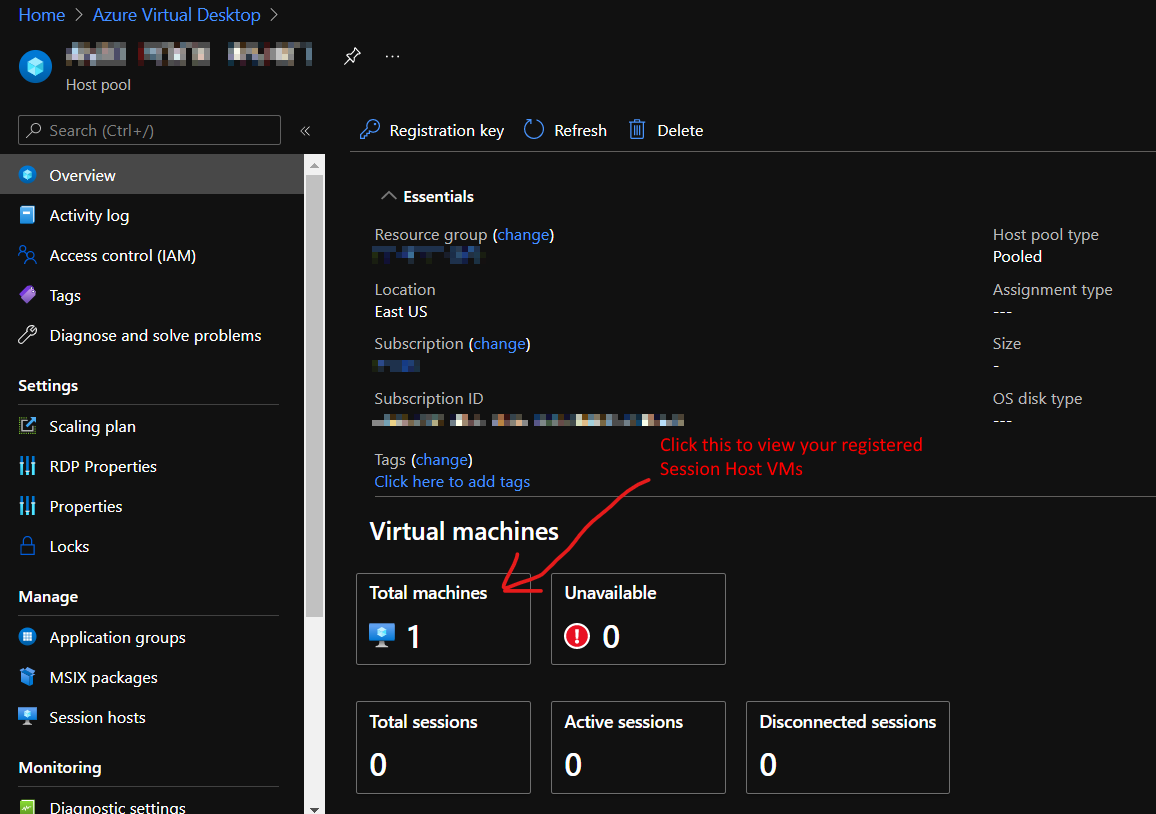
Once that is done, head back over to the Host Pool page in Azure Portal and hit refresh – you should see your VM registered. It may show Unavailable for a bit until the Agent updates itself and registers.
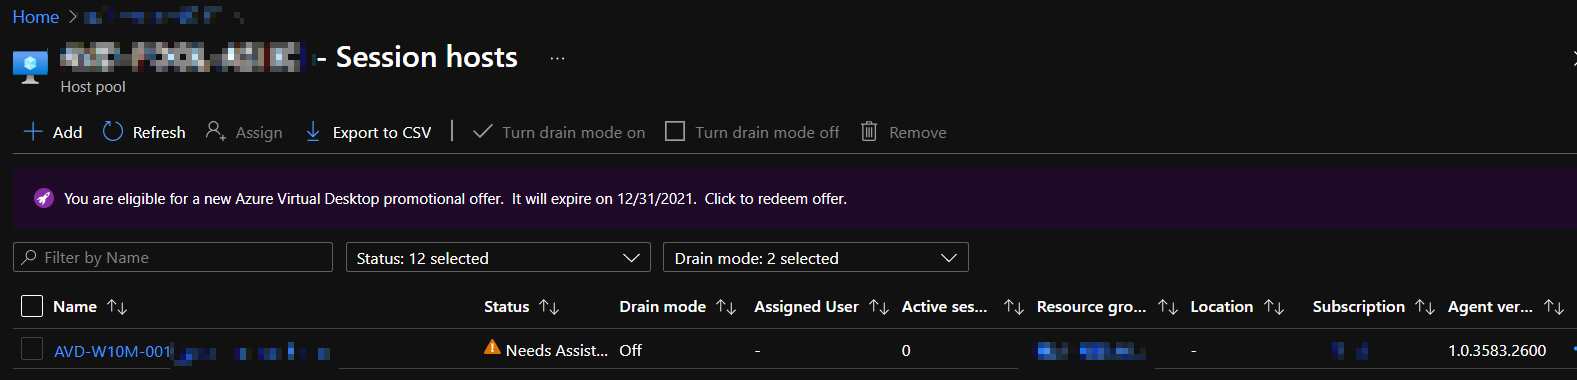
The VM’s status may flap back and forth a few times between Available, Unavailable, Upgrading, and Needs Assistance. Be patient during the first 5-10 minutes of the VM’s registration.
It may ultimately settle on Needs Assistance, which does not mean the VM is unusable. As of Nov 2, 2021, this may be a bug or regression in the agent and has no impact – so you can ignore it and move on.
Step 14
We now need to assign the AVD Application Groups to AAD users. By default, you have a Desktop Session Application Group created, which is a traditional RD Session.
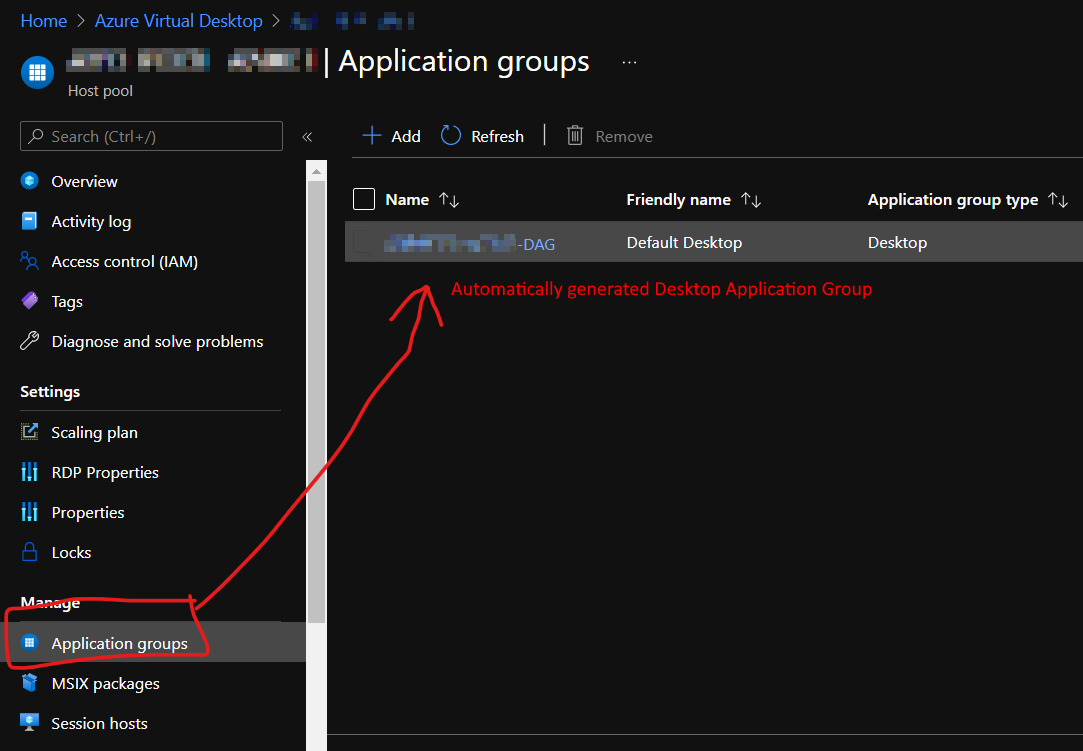
Click on Assignments and add the AAD users you want to be able to access your AVD App Group.

Step 15
Configuring FSLogix for User Profiles is entirely optional, but strongly suggested.
For this demo, we will make a File Server VM running traditional Windows Server joined to our on-prem AD. That VM has a separate 200GB VHDX mounted as the P: drive. Inside that drive is a single folder called UserProfiles (you can name the folder whatever you want).
We’ll also need a Security Group created in on-prem AD that consists of all the users who will access these Session Hosts. You may already have done this to make Remote Desktop Users or Local Administrators permission easier. Feel free to reuse these groups.
On your File Server VM, create an SMB share on the UserProfiles folder, remove the Everybody access, and add the Security Group(s) to the share as Full Access. Make a note of the UNC path and remember it for later.
Now on your AVD VMs, you need to change some registry settings to leverage the SMB share for the user’s profile data. Since we are using the Windows 10 Multisession image, the FSLogix agent is already installed; so this is a simple update to the 2 highlighted entries. If they don’t exist, make them:
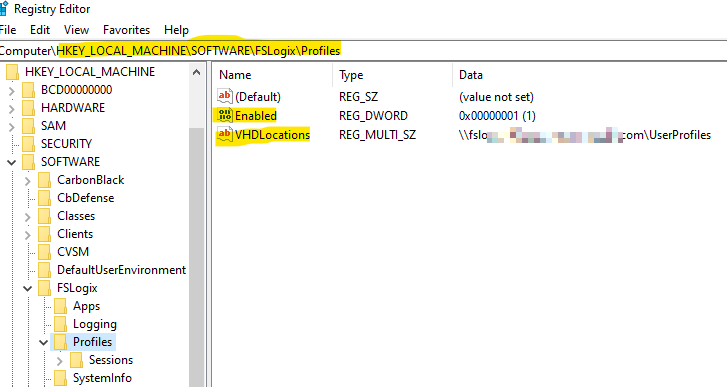
Reboot the AVD VM and now when your users login, their Profile will be created on the share. As you add more session hosts, this assists in mobility of existing data.
Step 16
Time to test it all out! Browse on over to https://rdweb.wvd.microsoft.com/arm/webclient to launch the HTML5 RD Client and connect to your Session Host. If you have used AVD before, that URL may look familiar, but it’s not the same! The /arm/ path is completely new, just for this on-prem experience.
Thoughts and First Impressions
Remember, this is the first Preview of a service that is very mature on other platforms. The full suite of features such as auto-scaling, Azure AD-joined session hosts, scheduling, single-pane-of-glass VM provisioning, etc are not ready yet.
With that being said, there are potentially huge benefits for companies who need:
- Data governance – for industries who require data stay local to their geographical region
- Better performance – avoid latency by pulling data across the wire into Azure by running workloads locally
- Reduced cloud costs – GPU workloads in the Public Cloud are expensive! Invest in an Azure Stack HCI hardware solution and benefit from Windows 10 or Windows 11 Multisession
- Increased security – VMs exist on your network, so you can leverage existing network appliances and SIEM to see ingress/egress
- Lack of complex infrastructure – You no longer need to maintain Remote Desktop Gateway, Session Brokers, and custom NPS configurations. You get all of that at the Azure AD layer (which if you use Azure Sentinel and Security Center, your insights into user access are fantastic!)
Pricing is a bit layered:
- User access – You could BYOL, but if you have M365 E3/E5/F3 or Windows 10 Enterprise E3/E5, you get this “for free”. More details here.
- Physical hosts – Your Azure Stack HCI hardware needs to be registered to Azure to be compliant. That pricing depends on the size of your environment.
- AVD on ASHCI specific costs – This is where things get a bit yucky. Pricing hasn’t officially been released yet, but you won’t get charged during preview. It will be based on vCPU count of your session host VMs, so if you leverage SMT capable hardware (exposes hyperthreading to your VMs), you can probably save at least 50% than by not using SMT hardware.