One of my biggest pet peeves when installing software is when the installer outright says to you “you cannot change these values after otherwise you’ll need to reinstall”. It’s like the developer is speaking to their grandfather assisting them reset their WIFI – “unplug it and plug it back in”.
With SPF, you’re prompted during install to change the default port from 8090 to something else. Most people would want to flip it to HTTPS on 443 and you would assume you would just change the binding in IIS to do that. Well, that’s just one step, because they bury the port value in a web.config file and the registry. Why don’t they just store it in a single location, like say… the SPF SQL database? Who knows. But here are the steps to get your environment working without a full rebuild.
1 – IIS Website Port Bindings
This one is fairly obvious if you have ever administered IIS before. There’s only a single SPF website that you need to change here. This is also where you would assign your SSL certificate and possibly bind an IP address and host header name. Those steps are not necessary, but if you do decide to change the host name, you’ll need to change it somewhere else (more on that later).

2 – Registry
This one is easy. Pop open regedit and browse to HKLM\SOFTWARE\Microsoft\Service Provider Foundation and change the PortNumber key’s value.

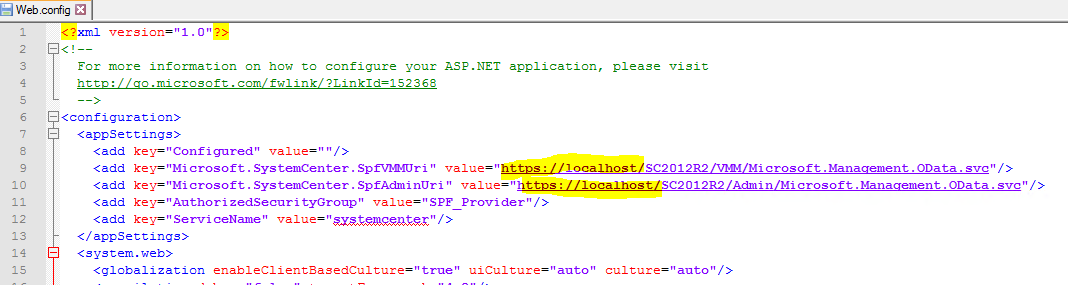
3 – Web.Config
The last change is buried obnoxiously deep in one of the web application’s web.config file. I presume the key is set during installation – something even Microsoft Premier Support couldn’t find documented anywhere. Five days after a SevB ticket was opened and Premier Support was engaged the SCVMM Product Group without answers, I grew annoyed and started searching for the port’s value as a string everywhere. And I found it.
Browse to the directory where your SPF website’s Provider folder is located – by default, it should be C:\inetpub\SPF\Provider
Open up the web.config file and edit the highlighted lines below. If you bound your website to a specific host header name in Step 1, this is where you would change “localhost” to match that FQDN.